Before we can use jQuery in our SharePoint web part we need to find a way to reference the library. There are a few options available to us, of which one is to simply add a reference to the script via a Content Delivery Network (CDN). In the example below we’re referencing the jQuery library via Google’s CDN:
| <script src="https://ajax.googleapis.com/ajax/libs/jquery/1.7.1/jquery.min.js" |
| type="text/javascript"></script> |
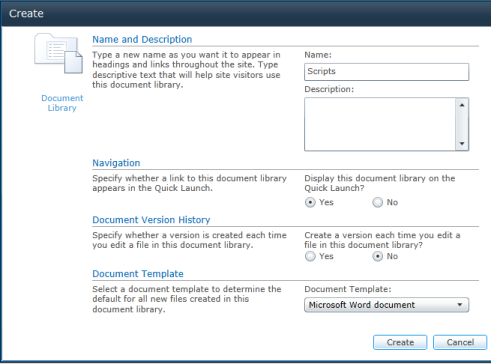
Another option and the one we’ll be using for this example is to create a SharePoint document list to hold all your scripts. Create a new document library in SharePoint by selecting New Document Library from the Site Actions menu.

Name the library Scripts and click Create.

Next, we need to add the jQuery library file to the Scripts SharePoint library. Head over to http://jquery.com/ to download jQuery. Name the file jquery.js and upload it to the Scripts library. One benefit of storing your javascripts in a SharePoint list is that you can reuse it.
The nice thing about jQuery is that it has a whole host of community developed plug-ins, one of which is Hovercard. We’ll use this plugin to show more details about items in a SharePoint list called Books. Download Hovercard and also add it to the Scripts SharePoint library.
Creating the SharePoint WebPart
With the jQuery library and Hovercard plugin file uploaded, let’s create a new Empty SharePoint Project in Visual Studio 2010. Today we will not use the “ADX SharePoint Ribbon” project template because our Ribbon Designer for SharePoint and Office 365 would add a new SharePoint feature already containing ribbon while we need a new empty project.
Select a local SharePoint site for debugging and make sure to select Deploy as a sandboxed solution.

Next, add a Visual Web Part (Sandboxed) item to your project. If you don’t see the Web Part (Sandboxed) item, you need to install the Visual Studio 2010 SharePoint Power Tools.

We won’t add any visual controls to our web part, but we’ll do everything in mark-up. The entire code listing for the Visual Web Part is as follows:
| <%@ Assembly Name="$SharePoint.Project.AssemblyFullName$" %> |
| <%@ Assembly Name="Microsoft.Web.CommandUI, Version=14.0.0.0, Culture=neutral, PublicKeyToken=71e9bce111e9429c" %> |
| <%@ Register TagPrefix="SharePoint" Namespace="Microsoft.SharePoint.WebControls" |
| Assembly="Microsoft.SharePoint, Version=14.0.0.0, Culture=neutral, PublicKeyToken=71e9bce111e9429c" %> |
| <%@ Register TagPrefix="Utilities" Namespace="Microsoft.SharePoint.Utilities" Assembly="Microsoft.SharePoint, Version=14.0.0.0, Culture=neutral, PublicKeyToken=71e9bce111e9429c" %> |
| <%@ Import Namespace="Microsoft.SharePoint" %> |
| <%@ Register TagPrefix="WebPartPages" Namespace="Microsoft.SharePoint.WebPartPages" |
| Assembly="Microsoft.SharePoint, Version=14.0.0.0, Culture=neutral, PublicKeyToken=71e9bce111e9429c" %> |
| <%@ Control Language="C#" AutoEventWireup="true" CodeBehind="jQueryWebPart.ascx.cs" |
| Inherits="jQueryAndSP.jQueryWebPart.jQueryWebPart" %> |
| <script src="../Scripts/jquery.js" type="text/javascript"></script> |
| <script src="../Scripts/hovercard.js" type="text/javascript"></script> |
| <h2> |
| Books</h2> |
| <div id="books"> |
| </div> |
| <script type="text/javascript"> |
| ExecuteOrDelayUntilScriptLoaded(LoadList, "sp.js"); |
| function LoadList() { |
| var context = new SP.ClientContext.get_current(); |
| var web = context.get_web(); |
| var bookList = web.get_lists().getByTitle('Books'); |
| var query = SP.CamlQuery.createAllItemsQuery(); |
| allItems = bookList.getItems(query); |
| context.load(allItems, 'Include(Title,Synopsis)'); |
| context.executeQueryAsync(Function.createDelegate(this, this.ListRetrieved), Function.createDelegate(this, this.RetrievalFailed)); |
| } |
| function ListRetrieved() { |
| var listEnumerator = this.allItems.getEnumerator(); |
| var count = 1; |
| while (listEnumerator.moveNext()) { |
| var currentItem = listEnumerator.get_current(); |
| var id = 2; |
| var title = currentItem.get_item('Title'); |
| var synop = currentItem.get_item('Synopsis'); |
| $("#books").append('<div id="book-"' + count + ' class="book" title="' + synop + '">' + title + '</div><br/><br/>'); |
| count++; |
| } |
| $('.book').each(function () { |
| var synop = $(this).attr("title"); |
| $(this).hovercard({ |
| detailsHTML: "<div><p>" + synop + "</p></div>", |
| width:400 |
| }); |
| }); |
| } |
| function RetrievalFailed(sender, args) { |
| alert("Could not retrieve list:" + args.get_message()); |
| } |
| </script> |
The LoadList function retrieves all items from the Books SharePoint list and the ListRetrieved function loops through all the list items and appends the values, using jQuery, to the books Div.
Finally, we loop through each html element that has a class name containing the word book and add a Hovercard to it with the elements’ title attribute as the Hovercards’ detailsHTML.
Packaging and deploying to Office 365 SharePoint Online
Once everything is tested you can package the SharePoint solution by selecting Package from the Visual Studio Build menu. This will create a .wsp file in your projects’ bin folder. Check your Output window for the full path to the file if you’re not sure.
Next, log into your Office 365 SharePoint Online account, and click on the Site Actions > Site Settings menu item.

Next, click on the Solutions link under the Galleries heading.

Click on the Upload Solution button on the Solution tab:

Select and upload the .wsp file and click OK. When prompted activate your solution by clicking on the Activate button.

Navigate to a SharePoint page, and insert the jQuery web part we’ve just uploaded.

Once you’re finished editing the page, and the page loads, it will display a list of all the items in the SharePoint Books list. When you hover the mouse cursor over a book title it will display the books’ synopsis:

Happy coding!
No comments:
Post a Comment